
If you are looking for something to do with your girls, making their own mermaid crowns can be the answer. Little girls will need additional help of course.
You’ll need some supplies for your mermaid. I found what I needed with the mini-haberdashery that has slowly grown in my cupboard.
Supplies:
- Glitter Foam Paper
- Foam Paper
- Elastic/Sequin Elastic Band
- Pencil
- Scissors
- Ponal Wood Glue
- A range of beads
- Clothing pegs
- Pins and a needle
- Cotton
Select your choice of elastic band, I used sequin elastic band that I had stashed in my cupboard. It’s come in handy in the craft department with my little one.

Measure your “mermaid’s” head for the perfect fit of a crown.

Draw the base of your crown if you don’t have foam paper, use cardboard. I prefer foam paper as it is soft and easy to use.

Once you have created your base for your crown. Use Ponal Glue to stick your base onto your elastic.

Use clothing pegs to secure the crown to the elastic band. Wait for it to dry completely.

Decide on how your little girl would like to decorate her crown. We settled on seaweed, seashells and a starfish.
You can print templates of what you would like. I sketched free hand drawings of the designs.


Before you glue your items, decide on how you’d like to position your designs.

We decided on a little more sparkle for the mermaid crown. I managed to find some beads. (I know, I know, I sound like a haberdashery). I used Ponal Wood Glue for the beads too.

I allowed the glue to dry over night before I secured the headband.

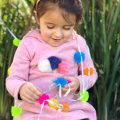
Adriana was ecstatic with the end result and was eager to wear it. Once I checked that the beads and the elastic band were dry, I used pins to secure the position of the band.
 After everything is ready and secure, the mermaid crown is ready to be worn.

Enjoy your mermaid crown and have fun.


Leave a Reply